Introduction of Photoshop
In this post you will learn about all the tools of Adobe Photoshop in English.
Photoshop is a special software that can be customized by taking various actions on pictures, which has been made by the company named Adobe, many versions of it have come on the market such as Adobe Photoshop 7.0, CS, CS2, CS3, CS4, CS5, CS6, and its new version has come on the market is Adobe Photoshop CC which is slowly replacing all other versions.
Main Window of Photoshop (Photoshop interface)

In the main window of Photoshop you will find various parts, like title bar, Menu bar, Properties bar, Properties bar also called Tool option bar, Tool box, Navigator box, etc. You can read full explanation by parts of Photoshop.
Title Bar
The title bar is at the top of the Photoshop window. In this, the name of the program and if a Photoshop file is open, its name is also shown. This time
Three small buttons are made on the right edge of: Minimum, Maximum / Restore and Closed, which control the size of this window.
Menu Bar:
Just below the title bar is a menu bar, in which names of various Photoshop menus are given. Clicking on the name of a menu opens the menu below, in which many orders are given. Clicking an order makes that order active. If the menu is open, pressing the right-left arrow button opens the right-and-left menu.
Tool Options Bar
Below the menu bar is the tool option bar, also called the property bar, in which different options are given about the selected or active tool at any time. You can make best use of that tool by setting as desired in these options. As you change the tool, the appearance of this bar also changes.
Toolbox
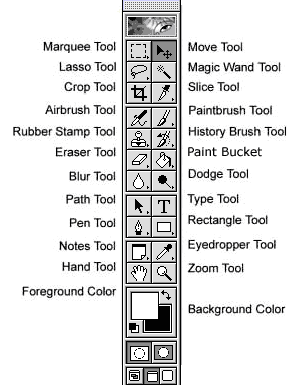
This is the main tool packet of Photoshop which contains tools for all the functions and features available in Photoshop. Anytime one of these tools is selected.
Selection Tools:
The tools in this group are used to select which image is complete or any part of it. The chosen part of a picture is shown with a flaring border.
If you click a selection tool and drag the mouse pointer over the image by pressing the mouse button, then according to the tool, the fixed size of the picture is selected. With the magic vend tool of this group, you can select parts of the picture according to color.
Painting Tools:
The tools in this group are used to color the image. There are many types of brushes, pencils, erasers, etc., with the help of which you can fill the color exactly as it is done with the actual colors. With its gradient tool, you can prepare the background in the shade of one or more colors.
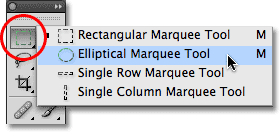
- Rectangular Marquee tool – It is used to select the picture in a rectangular part (length, width).
- Elliptical Marquee tool – It is used to select a picture in a circular or oval shape.
- Single row tool – Used to select a single row.
- Single column tool – Single column tool is used to select a single column.
- Move Tool - The layer or picture of any picture is used to move from one place to another and to transfer it to another picture.
- Magic wand Tool - Using this tool, we are used to select any single color in the picture in one click according to the pixel. According to its tolerance, similar colors can also be selected.
- Crop Tool- It is used to cut any picture. The part that is selected remains the same and the rest is erased and it starts appearing in full screen.
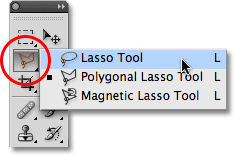
- Lasso Tool - This tool is used to cut the image but this tool is not able to cut the image correctly. Only the mouse experts can use it properly.
- Polygonal Tool - This tool is also used to cut the image, but this tool does not know to cut the corner of the picture in a curve.
- Magnetic Tool- With this magnetic tool you use to select any picture in which when you move the mouse from the side of any picture, that picture is selected. Pressing the backspace in the wrong selection causes a step selection to fall back.
- Slice Tool - This tool is used in ordinary and web pages. In which clicking on different parts of an image, different things can be done. But it looks like the same picture.
- Healing Brush Tool - With this tool, you can apply any part of any picture after selecting it with the alt button. In this, the picture automatic mashes the background.
- Patch Tool - This tool is used to remove stains in any picture.
- Clone Stamp Tool- This tool is also used like Healing Brush tool, in this you can use any picture to say and use it. But it does not contain background mash. Alt button is also used for this.
- Pattern Stamp Tool- It is used to use a pattern on the unwanted part of the image. The pattern used can be selected from the pattern library and also create its new pattern.
- Eraser Tool - This tool is used to erase part of a layer of an image. By erasing this, the background color will be seen by erasing the picture.
- Background Eraser Tool - This is used to erase any part of the picture to make transparent. After using this tool, after using the Eraser Tool, it will also be deleted in Transparent.
- Magic Eraser Tool - This tool is used to erase a single pixel of the picture in one click. Which gives transparent.
- Blur Tool - This tool is used to blur the image.
- Sharpen Tool - This tool is used to sharpen the image.
- Smudge Tool - This tool is used to spread any picture.
- Dodge Tool - This tool is used to lighten the color of any part of the picture. And can also be used to increase light.
- Burn Tool- It is used to darken any part of the picture with the same color.
- Sponge Tool - This tool is used to increase or decrease the color saturation on a part of the image.
- Brush Tool - This tool is used to fill any part of the picture in different colors and you can change the brush as well as add any brush to it.
- Pencil Tool - This tool is used to draw any type of line in Photoshop.
- History Brush - This tool is used while working on a picture to remove the changes made in the image from a particular part of the image.
- Art History Brush - This tool works like a history brush tool, the difference between the two is that the art history brush tool has different brush options that can have different effects. And the history brush erases it.
- Gradient Tool - This tool is used to fill multi color gradient (many colors) in the background in a picture.
- Paint Bucket Tool - This tool is used to fill a single color in a picture.
- Pen Tool- This tool is used in Photoshop to create a shape or to cut any picture. This photo is the best tool to cut the background, the above lasso, polygonal, magnetic tool can not cut the rounder but with the pen tool you can cut it well.
- Horizontal Type Tool - This tool is used to type text. It is typed from left to left by right.
- Vertical Type Tool- This tool is also used for writing text. But it is Vertical (top to bottom) type.
- Vertical Mask Tool - This tool is also used to type vertical text but, (it selects the background during the type.) The typed text selects the background from its outline.
- Horizontal Mask Tool - This tool is also used to type horizontal text but, (it selects the background during type.) The typed text selects the background from its outline.
- Custom Shape Tool - This tool is used to create different types of shapes on an image. This custom shape will also be found in the tool options bar in the pen tool. You can also fill colors according to your wish.
- Rectangle Tool - This tool is used to draw a rectangular shape on a picture.
- Rounded Rectangle Tool - This tool is also used for rectangular Shape (shape). But it has a corner rounded (neither round nor square).
- Ellipse Tool - This tool is used to draw a circular shape on a picture.
- Polygonal Tool - This tool is used to draw a polygon shape on a picture.
- Line Tool - This tool is used to draw any selected color line. The thickness of the line can be changed by going to the Weight tool option bar.
- Notes Tool- This tool is used to write notes in any part of the picture. (So that you can remember which effect to give in this picture or what to do in this part.) This tool can be used more than once. After writing the note
- Audio Annotation Tool - This tool is used to record audio as a note on any part of a picture. To use it, your computer must have a speaker and microphone. You can record audio by giving input from microphone. And you can hear the output from the speaker.
- Eyedropper Tool- Use this tool to select the color of any part of the picture. Note (The selected color is always set to the foreground color.)
- Hand Tool - This tool is used to move the picture. (You can move the picture with the mouse by pressing the space button despite taking any tool.)
- Zoom Tool - Use to enlarge the picture (zoom). You can zoom both ways by selecting and clicking.

Using Selection Tools
While doing any work in a document or before placing an order, we have to choose the item, picture, text or part of it on which that work will be done or that order will be applied. When working in Photoshop, it is much more important and before doing any work, it is necessary to choose the right part of the picture on which you want to do that work. The result of wrong choice will also be wrong.
There are many methods or tools available for selection in Photoshop,
so that you can choose only the right part completely. Any command applies only to the chosen part, meaning you can edit only the selected part of the canvas. That is the active part. If you want to place an order that applies to any other part or is applied to the entire canvas, you must either make a new choice or click on a blank space from the selection tool or press D (Ctrl + D) with the control Pressing should cancel the selection.
There are mainly three selection tools available in Photoshop:
Marquee Tools, Lasso Tools and Magic Wand. With the help of these tools, you can choose from a single picture to a single pixel. In addition to this, three other selection tools are available: Move Tool, Crop Tool The selection below shows all the selection tools and their pop-up menus.
Using Marquee Tool
Marquee Tool mainly consists of two
 Rectangular Marquee and Elliptical Marquee, also known as Oval Marquee. As is clear from their names, you can choose the order: rectangular and elliptical part with their help. At some point one of these tools may be chosen. To select another, hold the mouse button for a moment by bringing the mouse pointer to the tool that will open its pop-up menu. You can move the mouse pointer to that pop-up menu and click any tool and select.
The methods of using these tools are as follows -
Select the marquee tool you want from the tool box.
Move the mouse pointer or cursor over the canvas, where it will turn into a sign of the cross.
Move the cursor to the part of the canvas you want to select, hold down the mouse button and hold it in the desired direction by pressing it. The boundary line of the part chosen by this will be visible from the broken lines.
Release the mouse button once the required size is formed. This will select that part and will appear surrounded by moving lines like ants.
If you press the shift button while releasing the mouse button, the part to be chosen will be Perfect Square and Circular respectively.
You can choose multiple parts at once, for this, after making the first choice, you should press the shift key before clicking the marquee tool next time. In this way, if you want, you can also change the tool, thus you can choose many parts at once by making a choice. If the selected parts are coming at each other, then Photoshop will combine those parts and the same part will look like an ant surrounded by lines.
If you want some part of a chosen part to be removed from the election, this can also be done in Photoshop. For this you should click the Alt button before clicking the tool to select the part to be removed after making a choice. In this way, you can choose the part of the desired activity by mixing the parts that you choose and leave.
How to Work With Lasso Tool in Photoshop
With the Marquee Tool you can select parts with some regular attractors, but sometimes this does not serve our purpose, because we have to choose objects of Irregular shape, such as in a photo. One person's face, a flower from a vase or a tree from a scene.
This type of selection can be done with the help of the Lasso tool. In this, it is very important for your hand to be clean, with this your mouse and mouse pad should be clean enough to record even a little movement of the hand.
The Method of Using The Lasso Tool is as follows: -
Select the Lasso tool from the toolbox or press L, this will change the shape of the cursor on the canvas. Click on a border line of the item you want to select and hold the mouse button and carefully drag the cursor around the border line. This will show a solid line forming the path of the cursor when you are nearing the full selection, release the mouse button. This will make Photoshop complete by itself and the part you choose will appear surrounded by moving lines like ants.
It is possible that on choosing this way, that picture may not have come out right and some part of it has been left here or there or the extra part has been selected. In such a situation, you can remove the selected part by pressing the shift key just like a marquee tool.


0 Comments
Please don't Add spam links,
if you want backlinks from my blog contact me on rakeshmgs.in@gmail.com